Key Terms: Python, SDK, pip, path dependencies
During development, we often need to reuse code and functionality, and Python libraries (Python Packages) were created to fulfill this purpose. A Python library gathers the code modules written by the developer into a single package, allowing for easier and more elegant distribution through standardized methods.
Python Wheel (.whl) is a packaging format that is the recommended modern distribution format in the Python community. It was designed to improve package installation speed and simplify the installation process. Wheel is an optimized format compared to source code distribution because it is precompiled, so users don’t need to compile it during installation, greatly reducing installation time.
For our use case, Python Wheel is more like a collection tool. It allows us to install the library via pip install, and automatically resolve path dependencies under the site-packages directory, replacing the traditional manual path management for dependencies.
pip.First, make sure to install the latest version of setuptools:
pip install --upgrade setuptools[core]
Alternatively, you can:
pip install --upgrade build
Every Python package must include a pyproject.toml file, specifying the build system to use. After that, you can use any tool that provides build sdist-like functionality to generate the distribution.
Note: Due to security concerns and Python version restrictions, the use of setup.py for building packages has been deprecated by the community.
Project Structure: A standard Python project structure typically looks like this:
my_package/
├── my_package/
│   ├── __init__.py
│   └── your_module.py
├── pyproject.toml
├── README.md
└── LICENSE
Writing the pyproject.toml File: The pyproject.toml file is the core file for packaging and publishing to PyPI. It defines the project’s metadata and installation requirements. A simple pyproject.toml file looks like this:
[build-system]
requires = ["setuptools", "wheel"]
build-backend = "setuptools.build_meta"

[tool.setuptools.packages.find]
include = ["data_evaluation.*"]  # Directories included in the package
exclude = ["logs", "test.py", ".gitignore"]  # Directories excluded from the package

[project]
name = "data_evaluation"  # Project name
version = "0.0.1"  # Version number
description = "Implementation of VLA datasets evaluation"  # Description
readme = "README.md"  # Readme file
requires-python = ">=3.5"  # Required Python version
license = { text = "MIT" }  # License
classifiers = [
    'Intended Audience :: Developers',
    'Operating System :: OS Independent',
    'Programming Language :: Python :: 3',
    'License :: OSI Approved :: MIT License'
]  # Classifiers
dependencies = [
    "opencv-python>=4.5.1",
    "numpy>=1.21.0",
    "pandas>=1.3.0",
    "matplotlib>=3.4.0",
    "openai>=0.11.0",
    "scikit-learn>=0.24.0",
    "scikit-image>=0.18.0",
    "scipy>=1.7.0",
    "dashscope>=0.0.3",
    "oss2>=2.15.0",
    "pyyaml>=5.4.1",
    "tqdm>=4.61.0"
]  # Dependencies

[tool.setuptools.sdist]
formats = ["zip", "tar.gz"]

[tool.setuptools.package_data]
"data_evaluation" = [
    "README.md",
    "LICENSE"
]

# [tool.setuptools.entry_points]
# Uncomment and adjust if you have any CLI commands
# console_scripts = [
#     "data-evaluation-cli = data_evaluation.cli:main"
# ]

# [tool.setuptools.options]
# Ensure correct package generation
# packages = find:
Writing the __init__.py File: The __init__.py file makes the my_package directory a package. It can be empty but can also contain initialization code.
Next, we’ll build the project into a Wheel package. Make sure to have the necessary build tools installed from the previous step:
Build the Wheel Package: Run the following command to build the Wheel package:
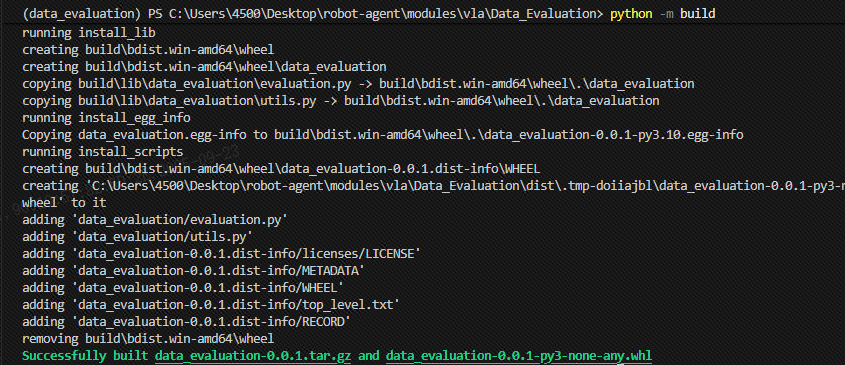
python -m build
This command generates a dist/ directory, which contains both the .tar.gz source distribution and the .whl binary package.
You can install the built package in a fresh environment using:
pip install .\dist\data_evaluation-0.0.1-py3-none-any.whl
Then, test the package by printing its directory:
import data_evaluation

print(dir(data_evaluation))
['__doc__', '__file__', '__loader__', '__name__', '__package__', '__path__', '__spec__', 'evaluation', 'modules', 'utils']
At this point, the package is ready for distribution.
Once the package is built, you can upload the Wheel file to PyPI so others can install it using pip.
Install twine: twine is a tool used for securely uploading packages to PyPI. Install it with the following command:
pip install twine
Upload the Wheel Package to PyPI: Use twine to upload the built package:
twine upload dist/*
If the upload is successful, users can install your package with:
pip install my_package